Devin Devine, stone artist based out of North East Pennsylvania
purchase inquiries contact devin@devineescapes.com
How to build a stone birdbath
Related Content: bird baths presently available for sale
So at it’s most simple, a bird bath is a stone with a bowl carved into it. Birds flying overhead see water, and they fly down to splash around and drink a bit. The type of birdbath that I’m going to show you how to make today is basically that simple, with a couple extra steps. I make these to sell. Delivery is available.
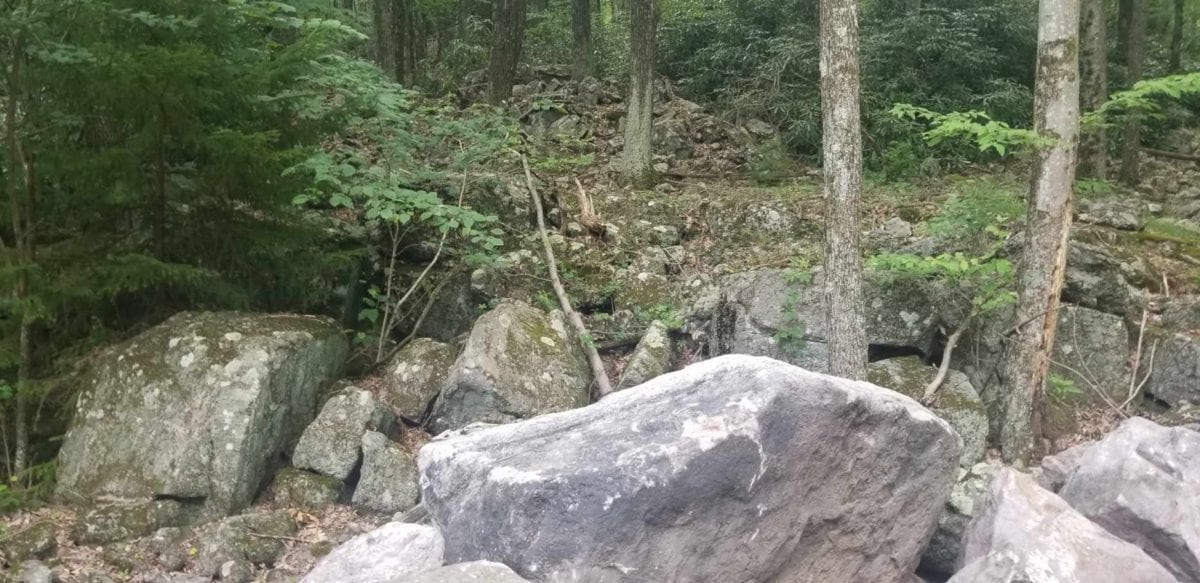
1. Firstly, find a good upright stone
Look for a stone of appropriate size, which will serve as the upright. So you want the stone to be kinda longish and with one end being heavier/wider than the other. In this case here, I found a stone that actually stands upright on its own–I did not need to cut the bottom off flat, so the thing would stand. Other times, I’ll find a beautiful stone of goodly size and shape–but the bottom is not flat, so I need to bust out the saw and do some cutting.
Sometimes I end up splitting a boulder in half in order to get the right size and shape– check out my articles on using feather and wedge and my article on using cut-nails to split stone.
contact devin@devineescapes.com to purchase
Sculpture by Devine Devine: Selected Gallery
How to build a dry stone wall
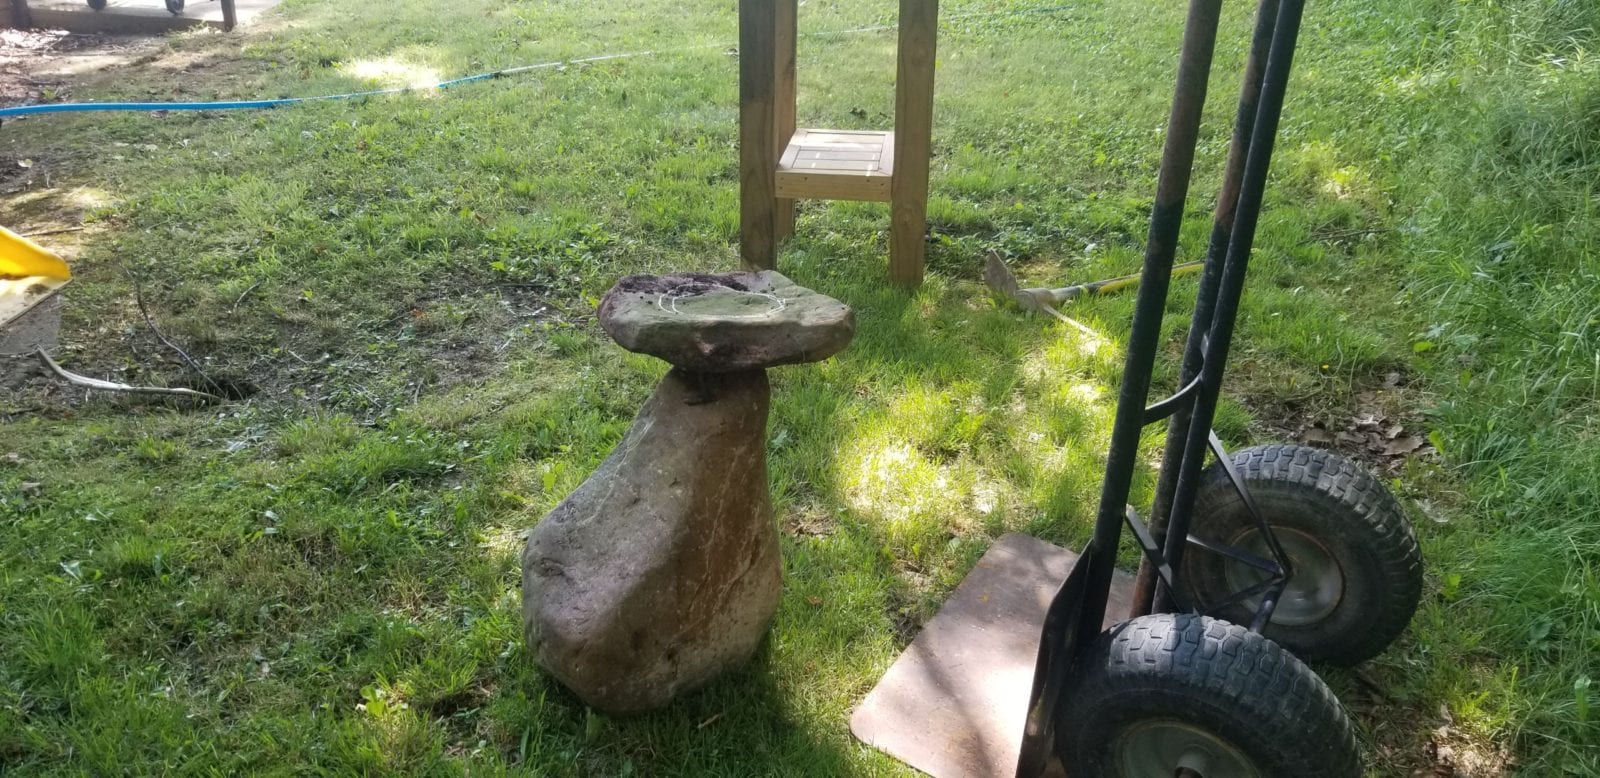
2. Find a top stone
So we have a stone that stands upright and looks good…..now we find a top stone. Found one about 3″ thick. And it even has a bit of a concavity on the one side. Perfect!
Now the bottom stone stands on its own, but the top comes to a point. So we’ll need to cut the top off of the bottom stone, so that the top stone can sit there. But before we do any cutting, let’s balance the top stone up there and see how she looks…
This article on stone-knapping may be helpful, if your top stone needs a trim.
how to build a stone birdbath
3. Flatten the top of the lower stone
Okay, we like the look of this, so let’s make that flat-top cut then, using a 4.5″ angle grinder.
A regular 4.5″ diamond blade will do the trick, but a flush-cut type blade is nice to have.
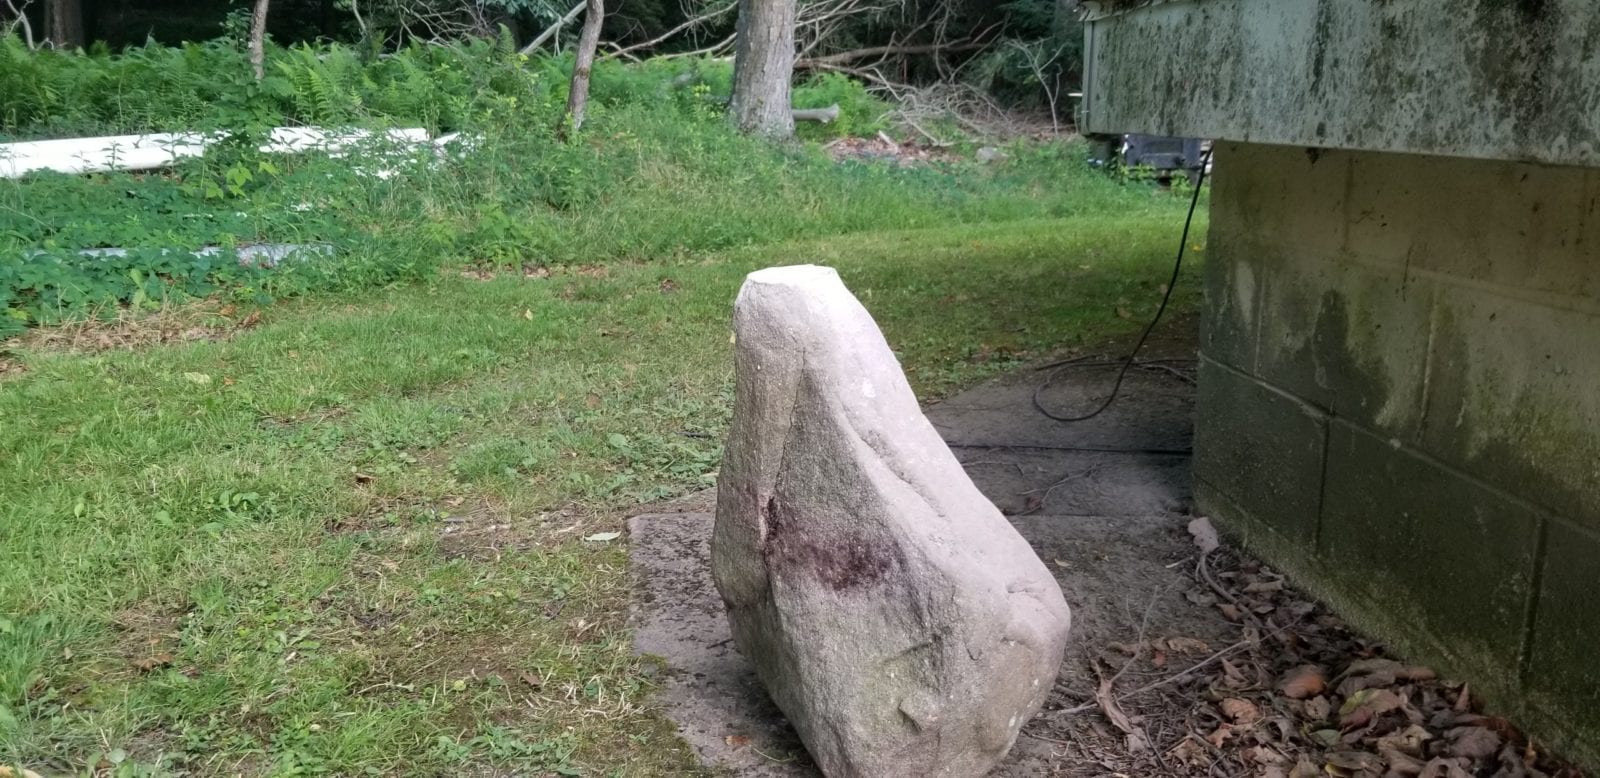
Also, let’s set the bottom stone on a hard flat surface, to be 100% confident that she will stand upright, no cutting needed. Since she does stand well on her own, let’s cut that top off.
related content: double basin, at the pollinator garden
If you find this content helpful or entertaining then please support this channel on ko-fi using this link: https://ko-fi.com/devindevine

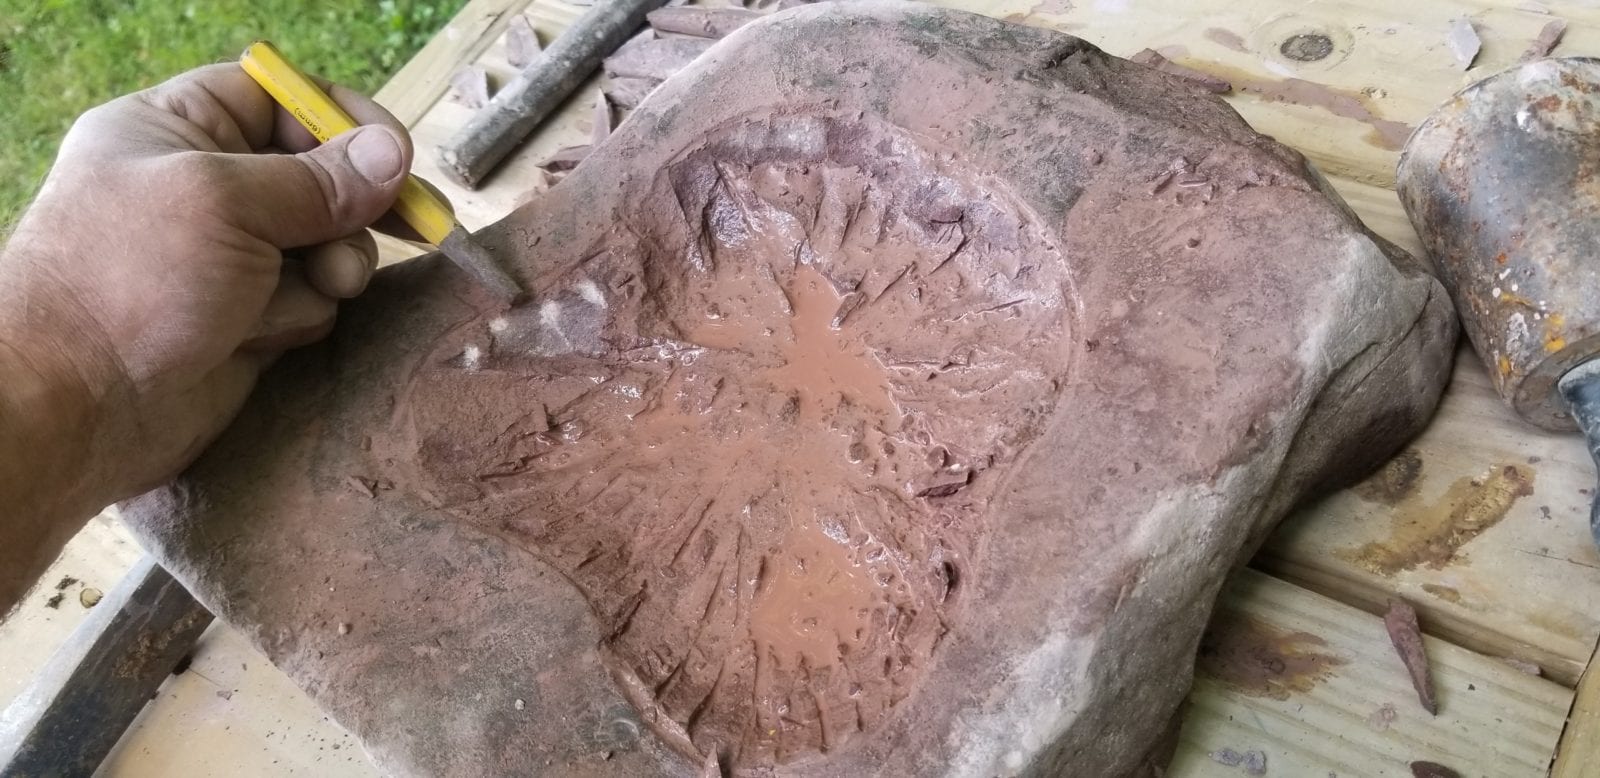
4. Carve out the bowl for your birdbath
Now we’re ready to carve out the bowl. This will be done using the angle grinder again, a hammer and a couple of chisels.
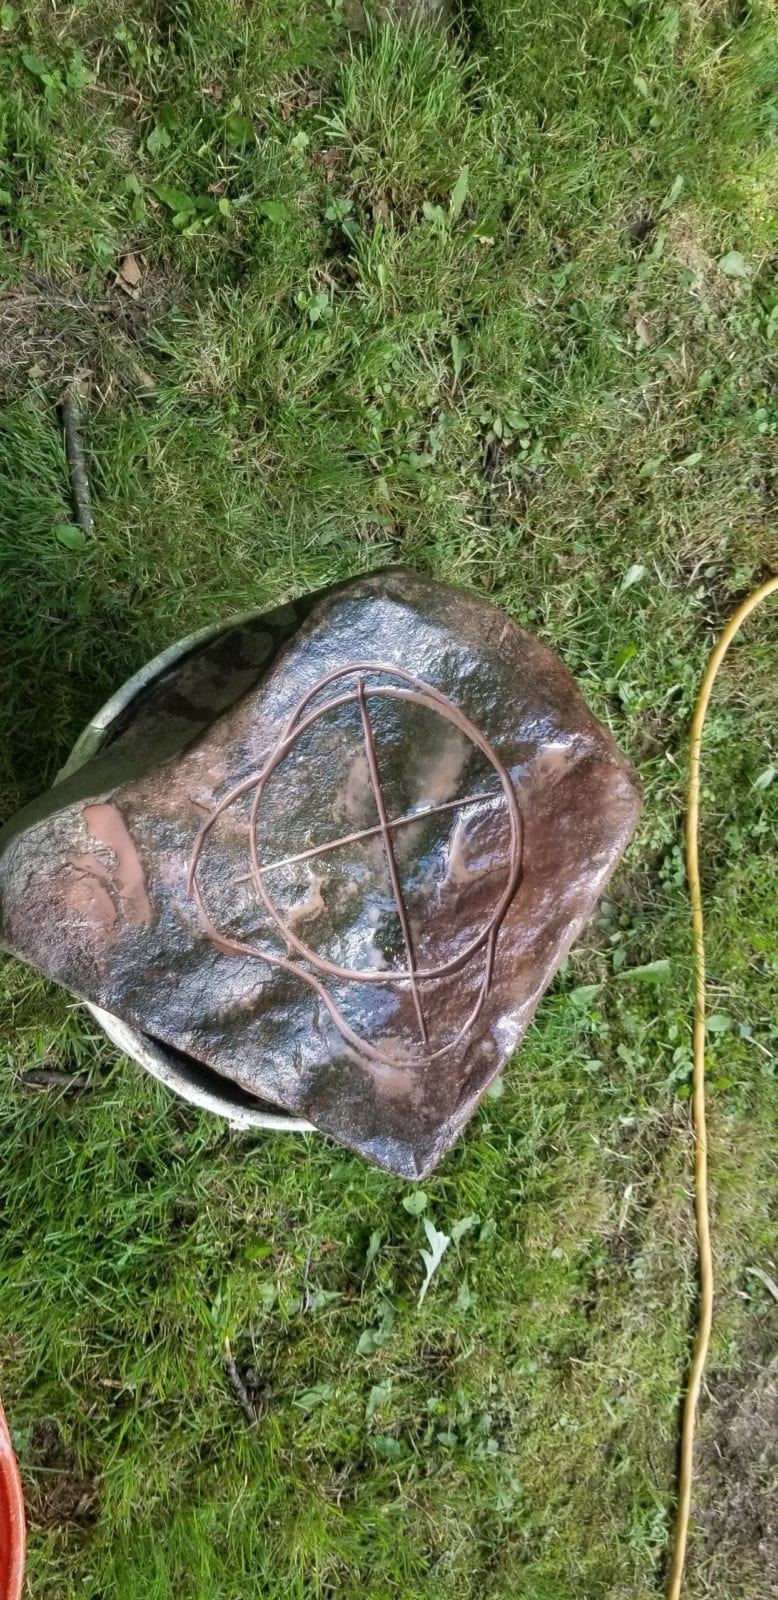
I used the angle grinder to trace out a circular shape…..then changed my mind and went with a more irregular organic shape.
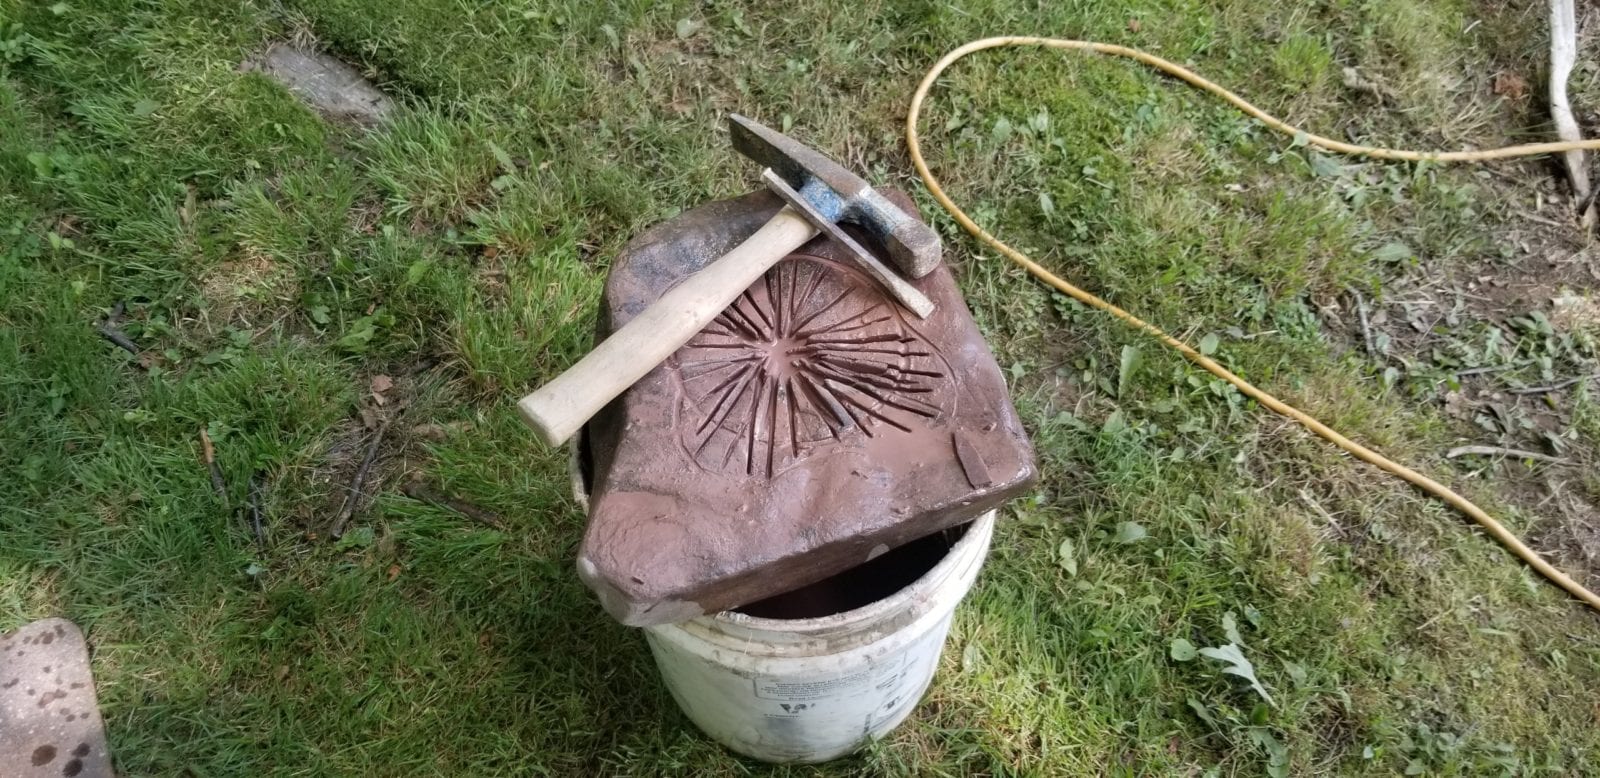
Next I use the grinder to make a bunch of stabbing cuts down into the stone. I sink the blade deeper in the center, more shallow out towards the edge, stopping just shy of the edge. All cuts radiate out from the center, in a star sort of pattern. Wear a dust mask! Here, you may notice the stone is wet. Here water was used, to cut down on the dust. Alternatively a fan may be used….whatever method you go with, you don’t want to be inhaling stone dust, as amorphous silica does pose a long-term health risk.
If you have experience doing carpentry, or working in other building trades, then you may have encountered the method called “cutting out tabs”. That’s what we’re doing here with our starburst pattern.
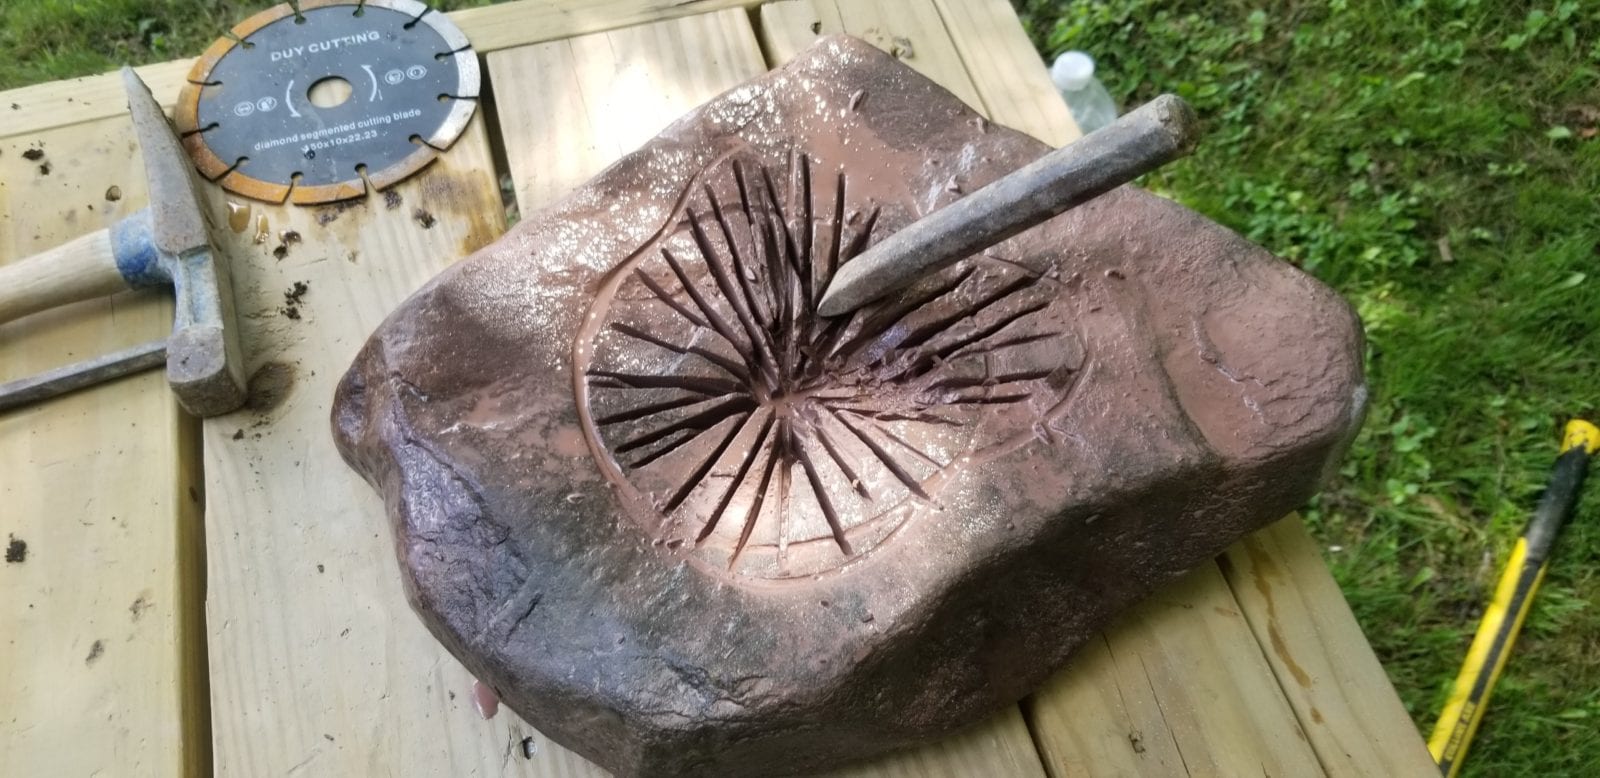
I did the grinder work with the stone resting atop of a 5-gallon bucket. Could have put the stone on the ground…but that involves having to bend over further. Could have put the stone on the table…..but the table sits at about stomach height, which is kind of an awkward height at which to be making these types of cuts. And of course, we’d prefer to not cut into out own body. Anyway, now that most of the grinder work is done, I put the stone up onto my stone carving table aka banker table. This is a sturdy table, used exclusively for stone carving.
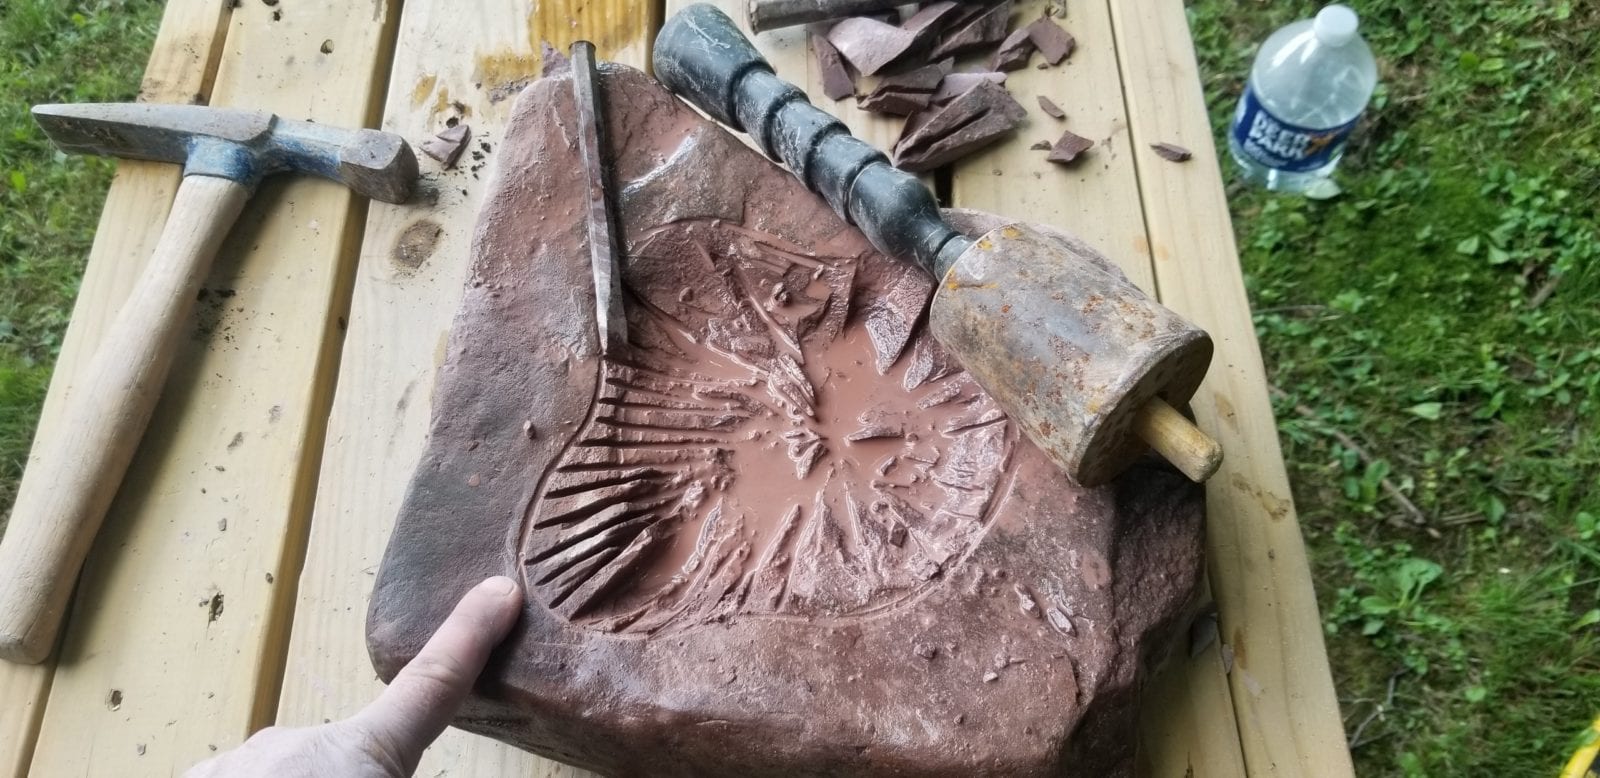
I usually use the round hammer/bell hammer for work with chisels. The round surface is supposed to drive the force down upon the chisel with less effort than a square hammer…but more importantly is knuckle protection. When you miss, or if the hammer head is deflected from the chisel, then the hammer tends to roll off the surface, and roll along your hand. This is muchly preferable, rather than smashing your knuckle. Cause that hurts, sometimes for weeks and weeks after.

I’m using a variety of chisels, but could have completed the project with just one.
Now at this point I could just keep working the surface over and over with a chisel…..but since we want to get it done today, we can just pull out that grinder again.

Smooth it out a bit with one of these angle grinders….uh, do not remove the shield guard from your angle grinder. I honestly* don’t know what happened to the guard that belongs on the grinder shown here. Dust masks is important too! Safety glasses, hearing protection–all that jazz. Stay safe, you guys!
Seriously….Beethoven was deaf, in his later years, and reportedly was a miserably person to be around. Wear ear protection dust mask and goggles.
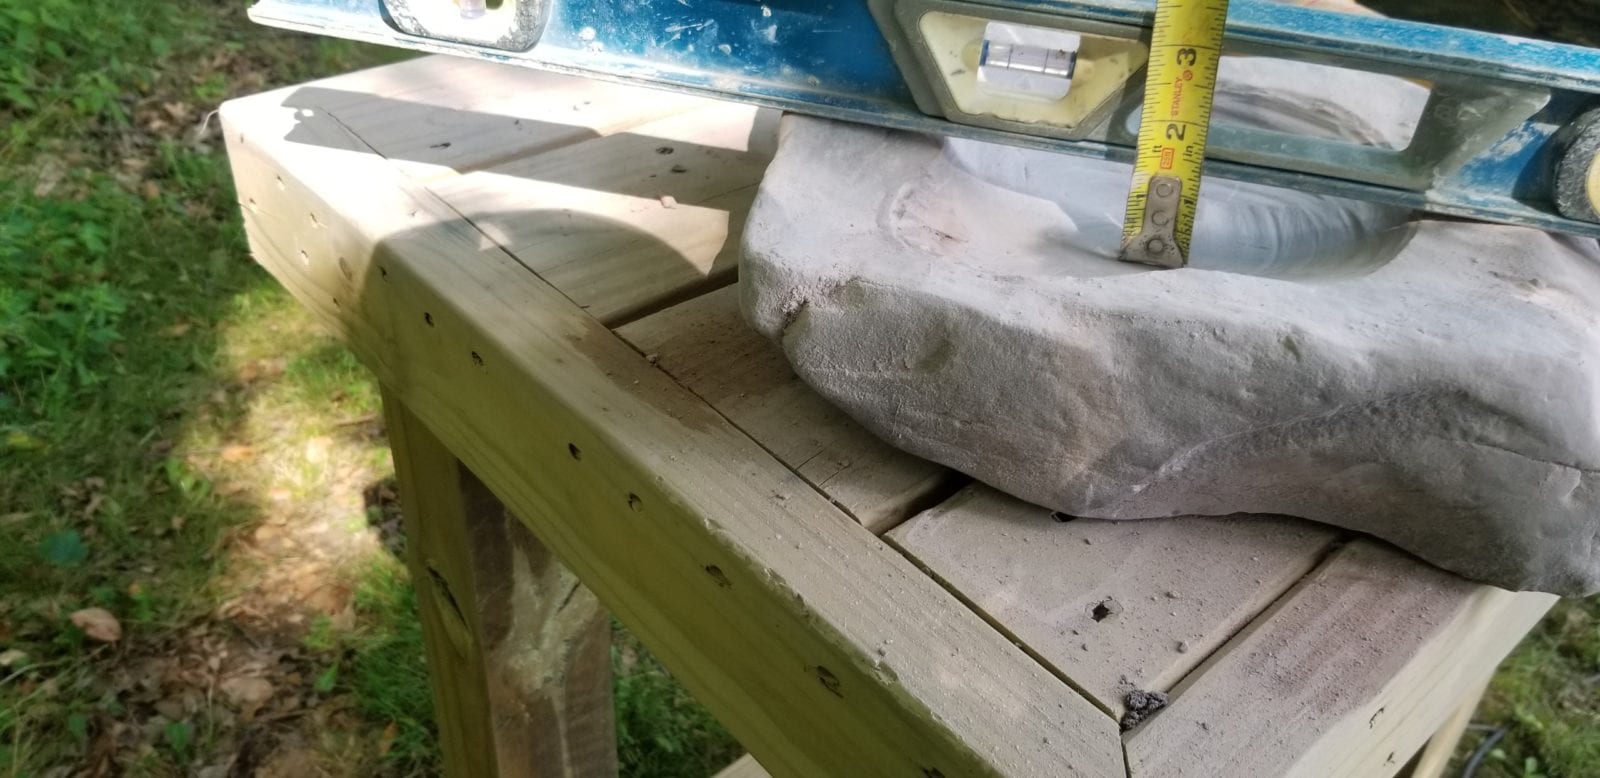
How deep should a natural stone birdbath be?
Good question! Deeper birdbaths will attract larger birds but may intimidate smaller birds.
The water should be no deeper than 0.5 to 1 inch at the edges, sloping to a maximum of 2 inches deep in the middle of the bath
UPDATE I’ve since learned that bird baths can go much deeper than that, and birds will still use them–especially if it slopes in gently, having shallower edges, for smaller birds.
A note on specialty tools:

I could adapt these methods to whatever tools the average Joe has in the garage: instead of an angle grinder, use a skill saw–just buy a diamond blade for it. Use a cheapo chisel from depot/lowes, in conjunction with a claw hammer. Finish the bird bath basin: with regular sand paper.
Birds LOVE these natural stone bird baths. See for yourself:
.
Phone consultation services now available
DIY Flagstone and Hardscape and stone art help
My rates for DIY consultations are as follows:
$88.00 for a half hour consultation
$138.00 for a full hour
Monies are payable via VENMO or paypal Add $4 for paypal orders.
email devin@devineescapes.com to schedule a consultation
For this type of birdbath, the majority of the work is hunting down the “right” stone. It may be debatable whether or not we want to call this type of birdbath art or sculpture…..but there is an “art” to finding the “right” stones, that have the approximate right shape and dimensions….and also, a natural beauty, or a balance of form, that is satisfying to the eye. Sometimes, more time is spent in the hunt, than in the carving.
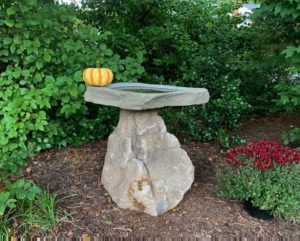
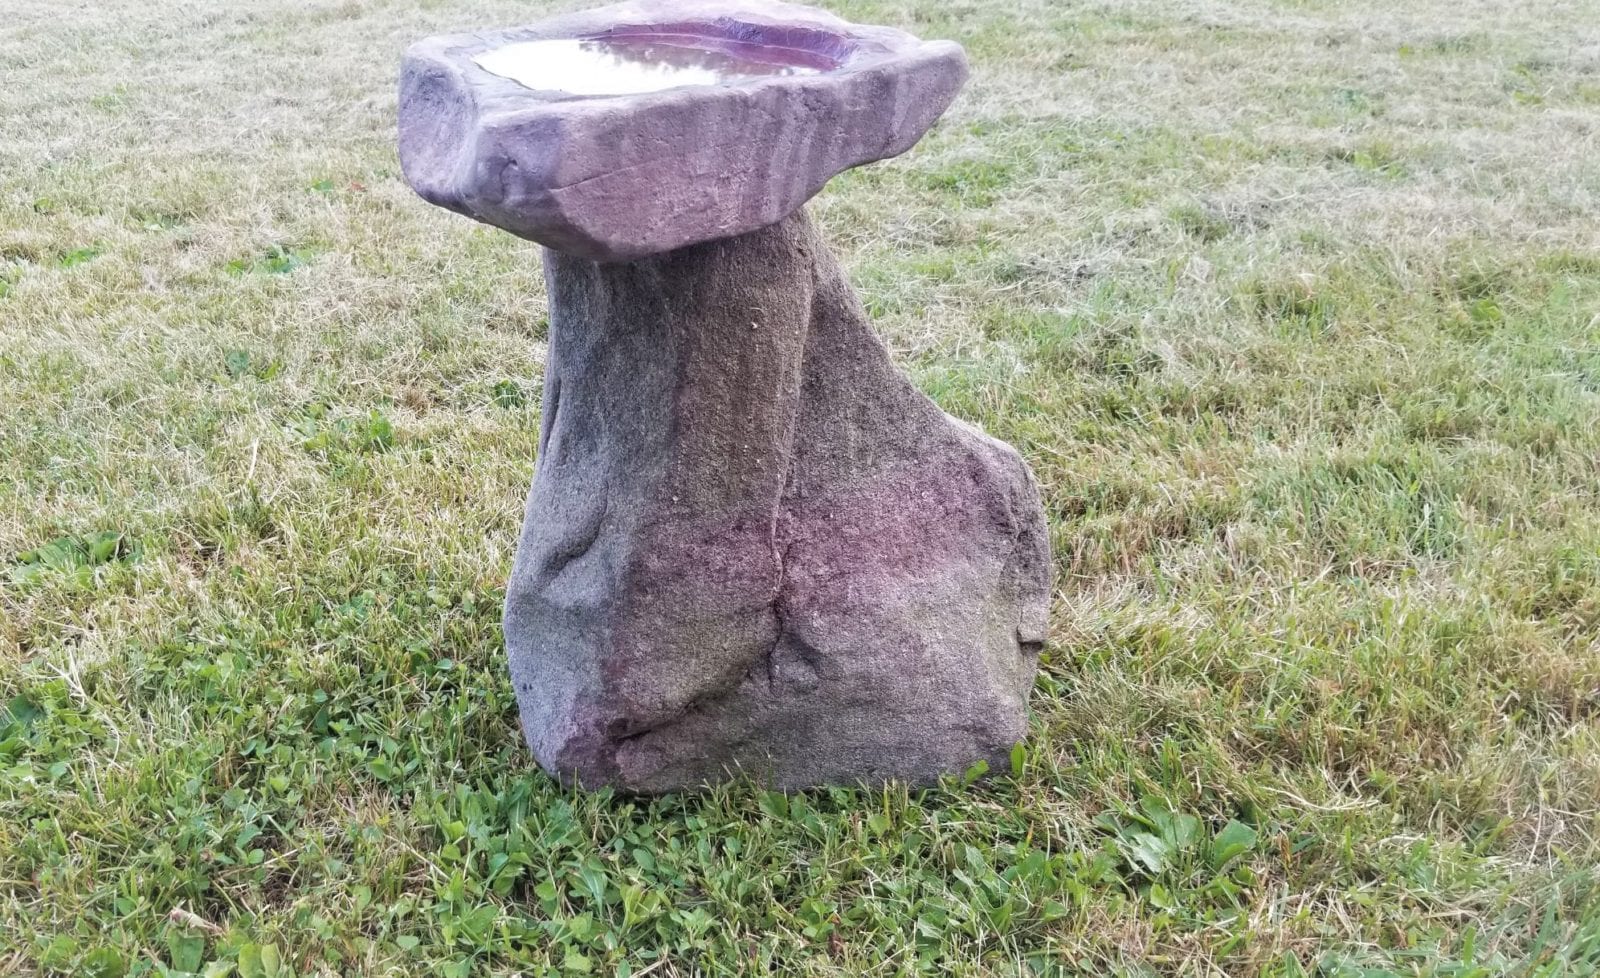
The finished bird bath:

Well, almost finished….
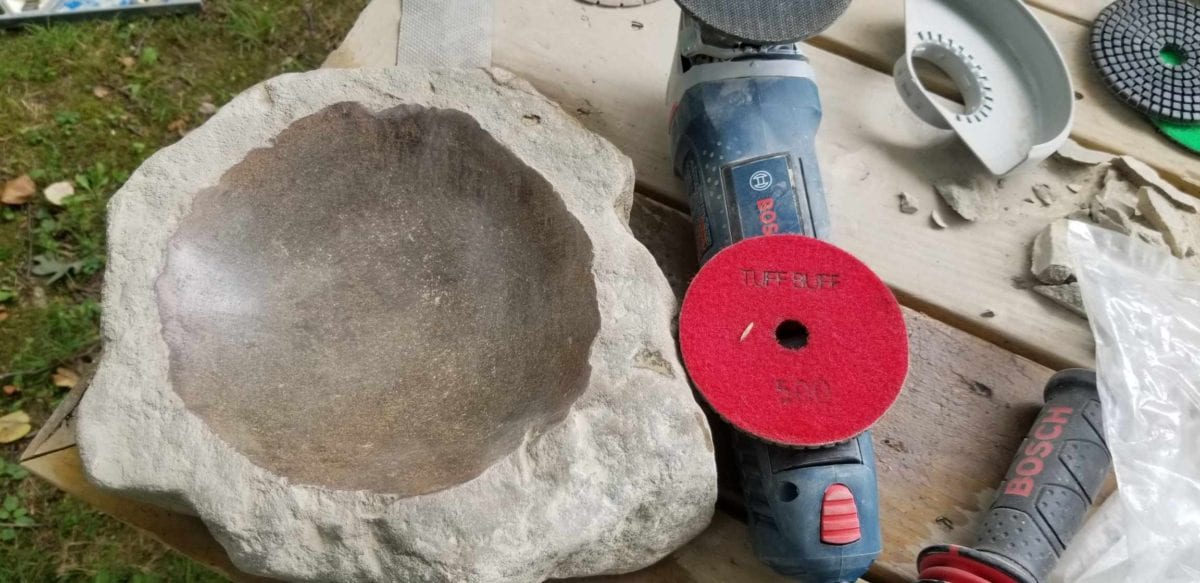
5. Finishing the bird bath
For the final finish, you’ll want to smooth out the texture of the bowl. The 2 methods I’ve used are torching, and polishing. Note I’m no longer recommending the torch method, as polishing makes for a much easier to clean surface,
Surfacing the birdbath using an angle grinder with polishing pads
- buy a variable speed angle grinder. regular angle grinders are too fast for polishing pads
- buy a backing plate
- buy some polishing pads (THIS set comes with a backing plate)
- your local hardware stores may not carry these, might need to go online or to a specialty carving supplier
- the pads and plate will attach and remove via velcrow.
- Start with a lower grit, like 100, and work up to 800…. or more
- turn the variable speed dial on your grinder down to “2” or “3” (high speeds may send the polishing pad flying!)
A polished finish to the bowl of your birdbath with make the water bowl or basin stand out more, all bright and shiny, and possibly look “more finished”. The torch finish could be described as “more natural looking”…..so it is a matter of preference. If you’re a stone mason you may opt to try either, or both finishes. However, if you don’t already own these specialty tools….than a grinder and polishing backer and pads will be a smaller investment.
I usually work it up to 800 to 1000 grit, but it depends on personal preference and stone hardness.
Alternatively though you can use sand paper. They make diamond grit sandpaper, for polishing stone. Same deal, start with a course grit, work up to a fine grit. This will take approximately forever.
I use a combination method–the grinder with polishing pads is faster–for a simple bowl. For polishing smaller spaces/detailed grooves–the diamond grit sand paper comes in handy. Essential tools, if you’re going to get into stone carving.
related articles:
- hand made stone benches for sale
- hand made natural stone birdbaths for sale
- unique stacked stone sculptures by Devin Devine
- log arbors
- two-tier boulder fountain
If you find this content helpful or entertaining then please support this channel on ko-fi using this link: https://ko-fi.com/devindevine

Balancing (or affixing) the top piece of your bird bath to the lower piece
As long as the top piece sits stable, you’re good. If the top piece can sit and can take the weight of a bird on one corner, without toppling, all is well.
It’s all about surface area…how wide is the top of your lower piece? Less than half as wide as the top piece? If you’re upright piece tapers towards the top…you could just cut an inch or so from the top, thereby widening the surface area that the top piece sits upon. Or use a strong adhesive.
Alternatively, you could drill a 3/8″ hole into both top and bottom piece and use a stone peg. But that’s a bit tricky. A wooden dowel would work, too. I usually go with a stone peg–my super secret stone peg method allows you to pick up one of these birdbaths by the top piece, with all the weight of the lower piece hanging on it. Will make a video demo proving this…soon enough! A bit of fiberglass rod plus an adhesive could be used. Some people apparently just use a trow or two of mortar or thinset–and apparently that works for them.
In the meantime, have fun building your own stone birdbath!
or to purchase or commission a piece:
send inquiries to devin@devineescapes.com
Great article! Is the birdbath featured here still available?
Thank you. And no–the birdbath featured in the article sold around the holiday season last year.
Send an email to devin@devineescapes.com if you are interested in buying. These are available:
I have maybe 12 birdbaths currently available for sale. Here’s some of them:
https://www.devineescapes.com/wp-content/uploads/2021/04/handmade-stone-birdbath-3.jpg
https://www.devineescapes.com/wp-content/uploads/2021/04/handmade-stone-birdbath-4-scaled.jpg
https://www.devineescapes.com/wp-content/uploads/2021/04/handmade-birdbath-assortment.jpg
https://www.devineescapes.com/wp-content/uploads/2021/01/bird-baths-in-small-medium-and-large-sizes-1-980×864.jpg
(large one on the right still available, the other 2 are sold)
https://www.devineescapes.com/wp-content/uploads/2021/01/kid-brother-birdbaths1-1-980×641.jpg
Hi Devin, would like to look at ordering a bird bath. The two in the last picture above with slab base and bowl are very attractive.
Wendell,
Where are you located?
I have a bunch of birdbaths at my shop, in similar sizes and shapes. Shoot me an email at devin@devineescapes.com and I can get you info about availability and pricing.
I’ve seen your blogs on stone birdbaths and benches. I’m really impressed. I’ve been looking to do something a little creative at my own home here in the UK. It’s a 17th century stone cottage with woodland to the rear and dry stone walls in abundance so this style would blend in yet stand out if that makes sense. I hope you don’t mind me asking but your article mentions a “stone peg”. Googling comes up with nothing so I was hoping you could shed some light on this please?
Okay I’ll tell you. This is top secret technology here…I don’t mind you using this, but you gotta tell people who you learned it from.
I use basalt rebar.
Drill a hole just a bit smaller than the piece of rebar. One hole on each piece that is to be connected….glue can be added.
If it’s not going to be exposed to water, then a wooden dowel can be used instead….I’ve used a wooden dowel before, with no glue needed. Just make the hole a little snug, and the wood will do its thing. I’ve used basalt rebar too, with and without glue. Sometimes, it can be tricky to make the piece of basalt rebar fit snug into both holes, and glue can be used then, if needed.
Feel free to come back and post a photo, if you create something using this technique.
Thanks for sharing your secret. I just need to find a piece of basalt now.
I buy my basalt from basaltguru(dot)com
LMK if you find a good source for basalt rebar in the UK, and let me know if the trick works well for you. Fact is you could skip the step…and just affix the top piece with glue, or mortar.
Hello, thank you for the great instruction on making a bird bath! In the instructions you said you used multiple chisels but could do it with just one.
I am going to attempt my first one this year and am wondering what stone chisels you would recommend for a novice? What are the top 2 sizes/shapes for this type of job? I have been looking at some Rebit tools which have good reviews.
Thanks!
Great idea, but not particularly practical……birdbaths need to be drained and cleaned. This looks like it would simply be far to heavy to lift to clean. I built myself a birdbath with a reservoir for a solar pump and drilled a hole into the lower bottom so it can be drained and cleaned-out of a very large plant pot with a tray for rocks at the top and a fountain.
Imagine how funny it would be if I never considered how to keep them clean. I’ve been making and selling stone bird baths since 2011.
But let me ask you one thing: why would anyone need to lift up a “too heavy bird bath” in order to clean it? Spray it out with the hose daily when filling it. Scrubby dub with a scrubby scrub, whenever it looks grubby grubbed. If you hose it out often, then the scrubbing will be needed less often….once a month maybe. All depends.
The bird bath you came up with yourself sounds lovely. Thank you
you seem wonderful Devin. awesome guide. I can’t wait to make one, I suppose I start my hunt for the perfect stones now. thanks so much!!
Thank you for saying that. You’re welcome and I’m happy I could help 🙂